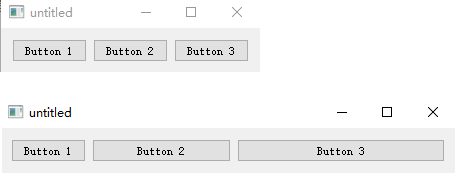
水平布局QHBoxLayout/垂直布局QVBoxLayout
2025-01-06
46
0
QHBoxLayout默认从左到右排列控件,但可以通过setDirection()方法设置排列方向。
在添加控件时,需要注意控件之间的间距和边距,可以使用setSpacing()和setContentsMargins()方法进行调整。
QHBoxLayout支持弹性空间的概念,通过addStretch()方法可以在布局中分配额外的空间。
函数
addWidget(QWidget widget, int stretch = 0, Qt::Alignment alignment = 0)
- 向布局中添加一个控件。
- widget:要添加的控件。
- stretch:控件的伸缩因子,控制其在布局中占用的空间比例。
- alignment:控件的对齐方式。
addLayout(QLayout layout, int stretch = 0)
- 向布局中添加另一个布局。
- layout:要添加的布局。
- stretch:布局的伸缩因子。
setSpacing(int spacing)
- 设置控件之间的间距。
- spacing:间距值。
setContentsMargins(int left, int top, int right, int bottom)
- 设置布局的边距。
- left、top、right、bottom:分别设置左、上、右、下的边距。
setStretch(int index, int stretch)
- 设置指定控件的伸缩因子。
- index:控件在布局中的索引。
- stretch:伸缩因子。
void setDirection(QBoxLayout::Direction direction)
- 设置布局的方向。
- direction:布局方向,可以是QBoxLayout::LeftToRight、QBoxLayout::RightToLeft等。
示例
#include <QApplication>
#include <QWidget>
#include <QVBoxLayout>
#include <QPushButton>
int main(int argc, char *argv[])
{
    QApplication app(argc, argv);
    QWidget window;

    QHBoxLayout *layout = new QHBoxLayout(&window);

    // 添加一个按钮到布局中
    QPushButton *button1 = new QPushButton("Button 1");
    QPushButton *button2 = new QPushButton("Button 2");
    QPushButton *button3 = new QPushButton("Button 3");

    layout->addWidget(button1);
    layout->addWidget(button2);
    layout->addWidget(button3);

    layout->setStretchFactor(button1, 1);
    layout->setStretchFactor(button2, 2);
    layout->setStretchFactor(button3, 3);

    window.setLayout(layout);
    window.show();
    return app.exec();
}

 QT-UI
QT-UI


